Feb 1, 2006
Fred Harmon
Baehr products are distributed in the US through:
National Cycle, Inc.
PO Box 158
Maywood, IL 60153-0158 U.S.A.
708-343-0400
http://www.nationalcycle.com/
http://www.baehrusa.com/
More photos can be found here:
http://www.pbase.com/fredharmon/baehr
The unit used for this evaluation was a Baehr R1150RT system that has three priority inputs. The only difference between it and the top of the line Ultima XL, is that the Ultima has four priority inputs instead of three.
Installation
Installation of the Baehr unit, like other intercoms, consists of two parts. Getting the intercom located and wired into the bike, and then getting the headsets installed into the helmets.
The first challenge you will always face when installing an intercom is where to locate it. Typically it should be located far away from ignition wires and coils as they can inject noise into the system. This usually dictates that the system is mounted under the seat toward the rear of the bike. Another consideration is length of the headset leads. In the case of the Baehr, I had to add straight headset extension leads onto both the rider and passenger leads in order for them to reach. Also, due to the fact that there are several adjustments on the intercom that you will need to access, it needs to be located in a place where you can easily get to it. That pretty much ruled out putting it under the seat on the GL1800, as you have to remove bolts to get the seat off the bike. The trunk would probably be the best place to locate the unit on this bike, but in the interest of getting it mounted quickly and not wanting to cut holes through to the trunk just yet, I mounted it behind the passenger lumbar support. This allows me to easily access all the adjustments by simply opening the trunk, though it does make the lower portion of the passenger backrest stick out just a bit. My passenger never even noticed it there, so this location seems to be working out.
Mounting location on the GL1800

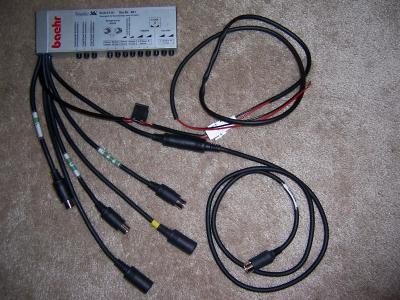
Once mounted, it is a pretty simple matter to string the wires. An interface connector plugs into the passenger headset connector on the GL1800 and the other end goes to the Baehr music input. This allows all the signals from the GL1800 audio unit to be passed through to the Baehr. On any other bike, this input would be typically used to hook in a Ipod or XM radio or whatever your music source is. Switched power also needs to be routed to the unit and I simply connected it to the switched accessory terminals on the GL1800 that are next to the battery. Then I added a straight headset extension lead to each of the headset leads, and routed them appropriately. I also added leads for the FRS radio interface and cell phone interface. Since my Radar Detector and talking GPS are already integrated into the GL1800 system though a Kennedy Dual AD set, I just let them get passed through the GL1800 audio system to the Baehr unit, but I could have just as easily routed them to one of the priority inputs on the Baehr, as it can handle them. The FRS and push to talk connector were a bit tricky as you can hook them up the wrong way as it is a Y cable with two male and one female connections. All the connectors are pretty much fool proof except this one, and if you hook it up backwards your FRS radio wont be able to communicate with the intercom. This connectors should be better marked so you know which end goes where. The cell phone and FRS lead and push to talk button all have to be routed up to the front of the bike. There is enough cable provided that they will all reach without needing an extension. Once the wires were strung all that was left to do is install the headsets and do a checkout of the system.
Headsets and mics
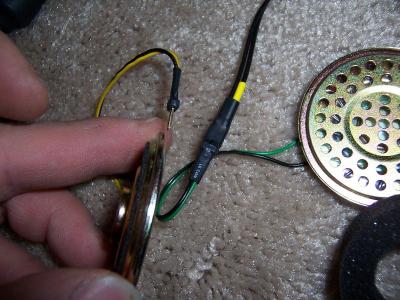
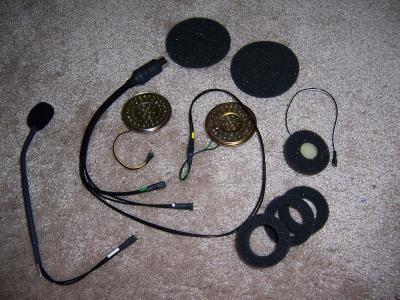 The headsets install pretty much like any other headset goes in a helmet. You make room for the speakers and position them and fasten them in place with Velcro and position the microphone and route the wires. The speakers and mic have small connectors on them that push into place, but dont actually lock together. I found that to prevent them from pulling apart if you tug on the headset lead, I had to add a small piece of tape across them to lock them together. These tiny connectors are normally buried inside your helmet out of site, but I wanted the tape on them as a bit of added assurance that they would not pull apart. The speakers themselves are extremely thin, probably the thinnest models I have ever seen in a headset, yet they are significantly larger in diameter than most headset speakers. This gives them an advantage in both sound quality and provides a wider loud spot making precise speaker alignment less critical when compared to other intercom systems. They are thin and small enough that I was easily able to mount them in three different popular helmet brands (Arai, Shoei, and HJC). Baehr provided me with both the boom mics and the standard mics as I was not sure which would fit my helmets. I tried both, and found that the standard mics are bit easier to mount, provided your helmet has the room to accommodate them. Once I had the speakers and mics mounted I simply tucked the wires into the helmet under the liner and used a zip tie to secure wire for the headset connector to the helmet itself, so that if you pulled on it, it would not yank out all the wires from the helmet. This step is an important one, and can take some creative thinking to find a place to secure the zip tie to in the helmet.
Thin Headsets with mini connectors
Setup and system checkout
The first thing I noticed on powering up the unit with the bike off, is that there is a very faint hint of white noise that comes from the unit. However, as soon as I turned on the music or started the bike, I could no longer hear it and this really is not a drawback as it is so faint you can only hear it with the engine and music off.
There are several adjustments under small rubber plugs that allow you to fine tune various aspects of the intercom and music levels as well as wind noise compensations. I began by adjusting both the rider and passenger volume levels to a comfortable setting with the GL1800 system volume set at mid range (12). When I plugged my headset into the passenger lead, I could not get any output. I quickly figured out that the riders headset has to be connected for the passenger headset to work. If no headset is plugged into the riders lead, the unit shuts itself down so that it wont drain the battery on your bike. This is a good feature and it means you probably could connect the Baehr directly to the battery if you wanted to since it would shut itself off when you unplug the riders lead.

Two items I really appreciated right from the start are the separate left and right volume levels for both rider and pillon, and the fader. The volume controls not only affect the music level but they also adjust the intercom and priority inputs as well, so the total system volume is controlled by these setting. The left and right controls allow you to compensate for a headset where one speaker is positioned a bit better and provides more volume, and the fader allows you to adjust the music level from rider to passenger. This is a useful feature for me as I always seem to like the music louder than my wife does. My only complaint is that I wish the adjustment for the fader could be put on an external controller so that she could change it herself while we are underway so she could use it as a volume control. The good thing about the fader is that even if you turn it all the way down for the passenger, it does not affect the volume from the intercom or priority inputs.
When I began testing the intercom function I immediately noticed a lack of a sidetone in the headset. The sidetone is what allows you to hear yourself speak in your own headset, so with the Baehr unit, you will not hear your own voice through the speakers. This really does not present a problem, but is just something you have to get used to. One advantage this provides is that if your own microphone picks up wind or road noise, you wont hear it in the headset. Baehr also advertises a sing along mode that will allow you to sing along with the music in the headset when riding solo, without tripping the mute function of music when a passenger is not onboard. So all you wanna be Mick Jagger types can belt it out to your hearts content.
There are also adjustments for the auto volume for both rider and pillion as well as wind noise adjustments for rider and passenger. I started out with these set at the mid point and they seem to work fairly seamlessly and I have not had to adjust them.
Adjustments for the output levels to each priority device are also provided, and this allows you to increase or decrease the amount of modulation provided to a cell phone or FRS radio, so that you can be heard properly at the other end of the conversation. Baehr is the only intercom I have seen that has these adjustments, as usually these levels are fixed. The ability to fine tune how well you are heard on the other end of a cell phone call is quite useful. I connected a Motorola FRS radio to the Baehr unit and was able to adjust the volume level that gets passed to the headset from the radio, and the volume of my voice on the other end of the radio.
The Baehr intercom has a somewhat unique approach to how they handle the wind and road noise problems that plague intercoms. Unlike many other systems they do not use a VOX circuit that turns the microphones on an off when you speak. The mics are always hot, which makes speech more natural, as there is not a pause when you start to speak before the mics turn on. But also unlike other systems, the mics do not pick up wind or road noise when you arent speaking. In addition to using noise canceling microphones, the unit uses electronic filters to filter out any wind and road noise that the microphones do pick up. These electronic filters appear to shut off when the system senses you are speaking and turn back on approximately 4 seconds after you stop talking. This allows you to have the best of both worlds, where your mics are always on, but you dont get wind and road noise from them when you are not speaking.
Priority Inputs
The priority inputs allow you to connect external devices to the Baehr like a talking GPS, cell phone, or radar detector. Each item can be assigned a priority which determines whether its signal will override or be overridden by the others. The unit I used for this test has three of these inputs and the Ultima XL has four. These priority inputs also have the ability to be used as outputs for items like CB, FRS radios, or cell phones. There is a modulation volume control for each of the outputs, but there is no individual volume control for the incoming signal.
Road Testing
My wife and I decided to give the Baehr unit a baptism by fire. On the first test, we took it out on a 100 mile ride into a 30mph head wind. This is probably the most difficult test an intercom will face and will reveal any and all weaknesses. My initial impression on using the intercom was that the voice quality was excellent and the lack of a VOX delay really made the system much easier for my wife to use as she was not always having a problem speaking loud enough to trip the microphone on like has happened with other systems we have used. Both the music and voice sound better due to the better speakers used in the headsets. She could almost whisper into the microphone and I could still hear her. The music automatically mutes to a lower level when someone speaks or there is input from one of the priority inputs and then returns back to the normal level approximately 4 seconds after you stop talking.
I initially had the wind noise settings at the mid point for both rider and pillion. Within a mile of the house I had to pull over and turn them both to max. Even with the setting at max, I could occasionally hear wind noise coming from my wifes headset. I partially attribute this to the fact that I used the boom microphone in her helmet, which is a bit more susceptible to noise than the standard mic. We traded helmets for a while since my helmet had the standard mic installed, and that definitely helped, but did not totally eliminate the noise. The wind noise was at a lower level and was normally not enough that it would cause the music mute function to trip, but it was just loud enough that I could hear it in the background, although it should be noted that the passenger could not hear any of this noise (thanks to the lack of side tone).
My wife also noticed an immediate improvement in the clarity of both the music and speech in her headset, and again, I attribute much of this to the higher quality speakers used.
The FRS communication between bike to bike and the cell phone integration worked flawlessly. I have not had any problems carrying on a conversation using either device and this portion of the system is top notch. I find using the push to talk button easy to operate and use for FRS communication and this really becomes a useful feature when traveling with another rider as it allows you to coordinate gas and meal stops and communicate through the ride. The voice quality is nothing short of excellent and I find FRS so much better and easier to us than CB.
I did notice that in order to get the same amount of music volume out of the Baehr as I did with my other system that I had to increase the input volume of the audio going to the unit, but not all that much. I did not have the rider volume set all the way up though, and I could achieve nearly the same levels by simply turning the riders volume control on full. The system was also tested while wearing ear plugs to see if I could achieve sufficient music volume, and I had no problem riding all day long with ear plugs in and listening to music and still receive my GPS and radar detector prompts.
Conclusion
For almost 10 years now, I have been in search of Intercom Nirvana and I have tested or used just about every system made in every price range. My problem has always been that every system I have used has fallen somewhat short of what I really need out of an intercom, which is a quiet system, that works well when I need to communicate to my passenger or another bike and one that also provides decent music quality. And then throw in the requirement to be able to use ear plugs on top of all that and you begin to see just how hard the road to Intercom Nirvana can be. What I would really like for some manufacture to do is integrate active phase noise canceling into a motorcycle intercom so that the speakers in the headset cancel out the wind and road noise so I dont need to wear ear plugs. But I digress. This system comes closer to reaching that illusive Nirvana spot than any other I have used. It also is by far the most expensive one I know of. The voice and music quality is excellent and the unit works properly and allows you to easily integrate other components into it. The many adjustments really make the unit flexible and allow you to configure it to your needs. I do wish that the fader or passenger volume control was on an external controller so it could be adjusted while you are riding. The speakers used for the headsets are the best I have seen and are also extremely thin and easy to mount. All the components and connectors are of high quality and the unit itself appears to be sealed well to prevent any moisture from getting into it. The only small fly in the ointment is that under some wind conditions, you can pick up some hint of wind noise from the passenger microphone, but this can probably be solve with a better wind sock for the mic. However, considering the cost of the system, I would expect better performance with the noise canceling circuits. Though this problem is not insurmountable and it does only occur with high winds or cross winds. Everything else about the system works flawlessly.
Pros:
Multiple inputs
Independent rider and pillion adjustments
Music fader
No VOX delay
Crystal clear voice and music quality
Output modulation adjustments
Noise cancelling mics and electronics
Cons:
Price
Slight wind noise in some situations
No sidetone in headset from your own voice