Electric Windbender Evaluation
The Windbender two piece windshield system and electric actuator assembly is made by
Firecreek Accessories
808 S. 7th Avenue
Yakima, WA 98902
Phone: 800-279-9997
509-452-4469
Fax: 1-509-453-6715
http://www.firecreekacc.com/
A complete photo layout of the system can be seen here:
http://www.pbase.com/fredharmon/electwindbender&page=all
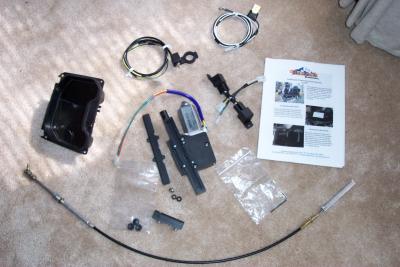
Installation Kit Contents
The electric actuator kit consists of the actuator motor and linear drive rack assembly, actuator cable and mounting hardware, control switch module, new glove box pocket, relay module and connection cable to the battery.
Well, first off let me start out by saying that this evaluation is mainly for the electrical actuator system of the Windbender windshield, and not so much an evaluation of the Windbender Windshield system itself. I will however say that the two piece Windbender system is a very unique design approach to resolving windshield buffeting, and it seems to work quite well. A new wider windshield is currently in also in work at Firecreek and it should provide even better coverage. I also have a photo gallery of the Windbender Windshield itself here:
http://www.pbase.com/fredharmon/windbender
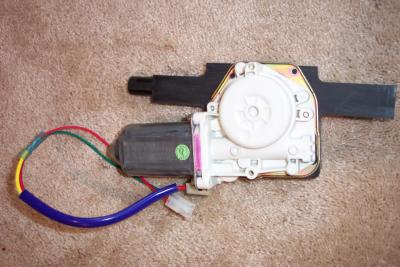
The Windbender windshield is the ONLY windshield system currently available that has an electrical adjustment option. So there really is nothing else on the market to compare it to. The closest comparison would be against other motorcycles like the ST1300, BMW K1200LT, or Yamaha FJR that currently have electric windshields. Unlike the systems on those bikes, the Windbender windshield does not change the angle of windshield, only the height. It operates much like an electric window in an automobile does, going only up and down on the slides. It is even powered by a linear actuator taken from a power window unit designed for an automobile. It is a VERY robust motor and drive unit and I can’t see how it would ever fail under any circumstances. The cable and actuator are also top notch and I am very confident in the overall mechanical design and durability of the system.
Linear actuator motor and drive
Installation
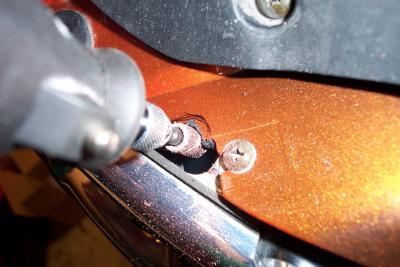
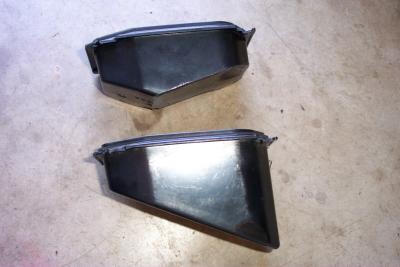
Installation is not too difficult and can be accomplished by the average person without much difficulty. The hardest part is getting up the courage to make a hole in the plastic for the cable. Fortunately, this hole is made underneath the front nose cover, so no one but you will know it is there once it is installed. I used a rotary Dremel tool with a small sanding drum attachment to make the hole. You will also have to sacrifice some of your front right pocket space, as the actuator is installed under the pocket, and new, thinner pocket is them used to replace the original. It has about two thirds the space of the original pocket.
I spent a considerable amount of time researching alternate mounting locations for the actuator motor and rack assembly, and there are a few locations it could be mounted in, but the length of the actuator cable prevents using them. After much time and effort I came to the conclusion that the existing mounting location for the unit is indeed about the best spot. The only real departure I made from the mounting instructions was to add a zip tie to secure the motor to the fairing stay, so it couldn’t move around.
The electrical connections consist of a couple leads that go directly to the battery and a switch that is installed on the left hand grip. The only drawback to the way it is wired is that the windshield operates even with the bike shut off and the key removed. This would only present a problem if someone played with the adjustment so much with the bike shut off, that they ran the battery down. However, being able to adjust the system with the bike turned off, is sometimes an advantage, like when you want to raise the windshield to clean it. Not having to power on the bike to do this makes it easier. The rest of the electrical connections simply plug together and no soldering or splicing is required. The connectors are also made so that you can not connect them incorrectly.
I already had a Windbender windshield, so I also had to drill some holes in the base of it to accept the mounting hardware for the actuator cable. A template was supplied for drilling the holes and it all went smoothly. The final step was to drill a hole in the top half of the windshield for the ball mount. I lowered the windshield as low as possible and then drilled the hole and mounted the ball stud.
Making the hole for the cable
Pocket comparison
Testing
Ok, enough about installation, how does it work? The first thing to do was a simple test of the system. The windshield now slides up and down smoothly on command. I measured a total of three inches of travel. This is my first, and only serious, complaint about it. Personally, I would like to have at least 4 or 5 inches of total travel.
Once I got on the road and started using it in earnest, I quickly began to appreciate it more and more. When in town or on a twisty section of road, I can lower the windshield to its lowest position for visibility. This also helps in the rain. Since I can now raise the windshield anytime I want, I actually find myself riding with it lower than I normally did. This also helps with gas mileage and performance. The bike feels more sporty with the windshield lowered and I have better overall visibility. Once I get on the highway, I can raise it back up to reduce the wind noise or to accommodate the passenger. After putting about 1,200 miles on it, I now feel that I can almost always achieve the height I want with the three inches of travel I have. However, there are times when it would be nice to have one more inch of electric travel. The Windbender base still moves up and down just like the OEM shield, so I can still also adjust the beginning height up a bit if it is not high enough. This adds about 5 more inches of adjustment to the whole system, but you must stop the bike to adjust the base height. I also discovered that many times just small changes in height would have a huge impact on buffeting. Usually just a half inch change in height is enough to make a noticeable difference. The impact on the passenger is even greater, and if you are riding two-up, you will want to keep the windshield higher for your passenger’s sake when at highway speeds.
Windshield all the way down:
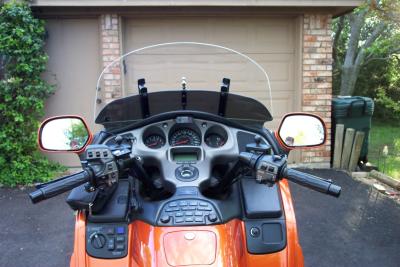
Windshield all the way up:

I located the control switch where the instructions said to, but when I started riding I found that it got in the way when I needed to use the horn. I use the horn as a safety device in heavy traffic, and I need instant access to it at all times. Sometimes when I would try to press on the horn, the Windbender switch would hit my thumb and it caused me to fumble for the horn switch. I loosened the switch and rotated it clockwise on the grip so it is a bit further back and out of the way, and I think this will remedy the problem.
Control switch mounted:

All in all, I am real pleased with its operation and performance. On the road it proves to be a very valuable item. I have ridden with it in rain, in a 30mph head wind, and a 20 mph cross wind. I can tell you for certain it made the trip easier. Sure, I could pull off and stop and make the same manual adjustments that I now do electrically while moving, but chances are I wouldn’t because I don’t like to stop. With the OEM system, if the windshield height was not right for the circumstances, I would just put up with it. Rarely, if ever, did I actually pull off the road to adjust the windshield height. I can only remember one time (in a 50mph Wyoming crosswind) actually pulling off to make an adjustment. By comparison, I now typically adjust the windshield on the fly once every 10 miles or less. Why? Because I can! I always have the windshield at the height I need for the circumstances and I never have to tolerate an out of adjustment windshield. At $370 for the actuator and drive, and $260 for the windshield this is a good buy. Granted, this is not a cheap accessory, but the actual utility of it justifies the price, especially when you consider that no one else has anything like it on the market. After having ridden with it on the bike for a few weeks, I now can not imagine going back to a standard windshield and I am really hooked on it and use it every time I ride.
The folks at Windbender have a video on their site of the system in action. You can see the video here: http://www.firecreekacc.com/windbender_video.htm