Fred Harmon
November 1, 2004
The Smart Tire system can be ordered through distributors and is available on line at:
http://www.nationalcycle.com
The cost of the system is $199
Additonal photos available on line here:
http://www.pbase.com/fredharmon/smartire

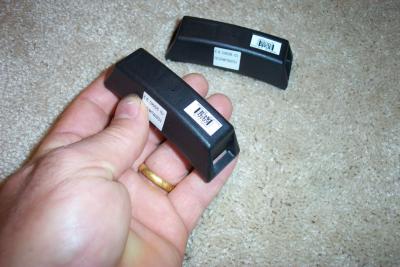
The SmarTire system consists of two independent wheel sensors that are mounted inside the wheels attached to the rims (via large hose type clamps) and a receiver/display unit that gets mounted in a visible location somewhere in the cockpit of the motorcycle, preferable in a line of sight location.
The system monitors both front and rear tire pressure and temperature and alerts you to any changes in pressure and allows you to monitor tire pressure and temperature while you are riding. The sensors transmit data wirelessly (via 433.92 MHz) to the receiver and are powered by an internal lithium battery that is designed to operate in higher temperatures and the manufacturer claims it will last roughly 7 years under normal use. When the batteries go dead, the sensors have to be replaced, as the sensors are completely sealed (potted) at the factory. Each sensor has a unique code that is “learned” by the receiver so that a nearby sensor mounted in a different motorcycle will not be received by another receiver.
The receiver is quite small and easily fits onto the dash of most motorcycles or in a similar location. It requires switched +/- 12 volt power from the bikes electrical system. This is the only electrical connection needed for the entire system as the wheel sensors are completely wireless. The receiver uses a built in helical antenna so that no external antenna or antenna wire is needed and allows it to receive in an omni directional pattern.

Installation:
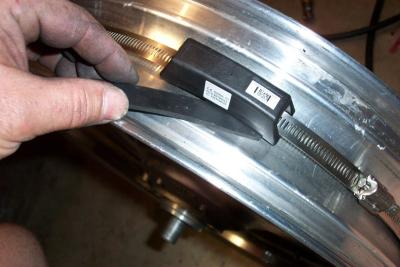
Normally SmarTire recommends the unit be installed by a dealer capable of removing tires and balancing wheels. However, since I have my own tire mounting device (Harbor Freight) and frequently change my own tires, I decided to tackle the installation on my own. Aside from the mounting/dismounting of the tires, I found the installation to be fairly straightforward. Once the tires are removed, the tire sensors get mounted to the rims by extremely long hose clamps that go around the circumference of the rim. There is also a small metal bridge that is used to lift the hose clamp over the inside edge of the valve stem so it does not block the air passage for the valve.
SmarTire recommends using the valve stem as the known heavy spot of the wheel and mounting the sensors opposite it, but many times I find the actually heavy spot to be off the valve stem by as much as 90 degrees sometimes. The trick I used when mounting was to first put each rim on my balancer (without a tire installed) to determine the actual heavy spot of the rim. I then mounted the sensor so it was 180 degrees away from the actual heavy spot. I did this to reduce the amount of balancing weight I would later need when I mounted the tire.
Once I got the sensor mounted, I then rebalanced the rim to see where the new heavy spot was, and I marked this spot on the rim. When I reinstalled the tire, I lined up the light spot of the tire with the new heavy spot on the rim. This reduced the amount of weight I needed to use to balance the wheel significantly. With the SmarTire sensors installed I had to add approximately Ľ of a ounce of additional weight than it previously needed to make it balance.
I did have one small problem with mounting the front wheel sensor that I had to overcome. SmarTire does not recommend mounting sensors in wheels that have a concave shape to the drop center of the rim. The sensor fits best into a rim that has a fairly flat center section. The rear rim on the GL1800 Gold Wing has a flat center, but the front wheel has a more concave shape to the center. I was able to solve the problem by simply cutting a small shim out of some hard Ľ inch rubber so that it would sit in the center of the rim in-between the sensor and rim and fill the gap caused by the shape of the rim. This seems to have solved the problem and allows the sensor to fit solidly on the rim. I suspect the folks at SmarTire could supply rubber shims that could be used on rims with concave sensors that would allow the system to be used on a wider range of rims.
(Sliding home made rubber shim into place)
Once the wheel sensors were mounted, I reinstalled the tires. Care has to be taken when installing or removing tires from the rims with SmarTire sensors installed so that you do not damage the sensors. SmarTire advises in the instructions the proper way to install and remove a tire is to locate the “pinch point” of the tire on the rim in the spot where the sensor is. You want to avoid inserting a tire tool into the rim at the spot where a sensor is located. You also need to be careful when you break the bead of a tire with a sensor installed so that you don’t put the bead breaker over a spot where a sensor is mounted. SmarTire includes two stickers to apply to the outer edge of the rim that indicate where the sensor is located so that you do not damage the sensor when removing and mounting tires. Any time you have these sensors installed in the tire you need to be sure to inform any shops that you have install tires on your bike so they are aware and take precautions not to damage your sensors.
Installing the receiver was relatively easy. The size of the receiver is small enough that it allows it to be easily mounted in a convenient and easy to view location. Ideally, it should be placed somewhere in the riders line of sight so that you will notice if the alert light goes off. I choose to cut a small hole in my dash and flush mounted it. As mentioned previously, the only electrical connections needed are for power to the unit.

Once the unit is installed, you need to program the transmitter codes into the receiver. When the unit is first powered on, it goes into the "learn mode" and you simple spin the rear wheel to make the transmitter send its code. Once the rear wheel is learned, you then spin the front wheel to excite the sensor in it so it will transmit and when complete, you push the button on the receiver to lock in the codes. The tire pressures that are measured during the initial learn procedure are also learned and stored as the optimal cold tire pressures. You can also easily reprogram the stored cold tire pressures if you need to change them for additional loads. The system uses 65 degrees F as a set point for the cold tire temperature.
System Operation
When the wheels are stationary, the transmitters shut down to conserve power. There is a centrifugal switch internally in each sensor and once the wheel reaches a speed of approximately 6mph, the sensors turn on and begin transmitting. They then continue to send updated pressure and temperature signals every seven seconds. Additionally, any time a sudden pressure change of 3 psi occurs, they immediately send a signal to the receiver.
The SmarTire system is designed to not only monitor tire pressure and temperature but also to provide you a visual alert in the event of a pressure loss or temperature exceeding 176 degrees F.
The system also takes into account the changes in pressure as a result of changes in the tires temperature and compensates for the change. This allows the system to determine if the tire has lost air, even if the pressure has increased due to the tire heating up. It also enables the system to tell you exactly how much pressure to add to a tire that is low on air to bring it back to its recommended cold pressure setting, even when the tire is fully heated from ridding. This is an extremely valuable feature of the system. The SmarTire system also claims an accuracy of 1.5 psi, which is better than most standard tire gauges.
There is a small yellow alert light on the receiver that illuminates in the event of a problem. SmarTire has two alert thresholds. The first alert (a flashing light) occurs when a tire loses 15% of its cold inflation pressure. The second alert (solid light) occurs when the tire loses 25% of its cold inflation pressure. When you first start moving, the display initially reads the front and rear tire pressure and displays them once the wheels reach about 6mph. After that the display goes into a semi-sleep mode and only displays small icons for each wheel. Anytime you press the button on the display, the unit wakes up and displays the front and rear tire pressures, temperatures, and temperature compensated pressure deviations.
(Yellow alert activated after an 11psi air loss in front tire)

Testing the system
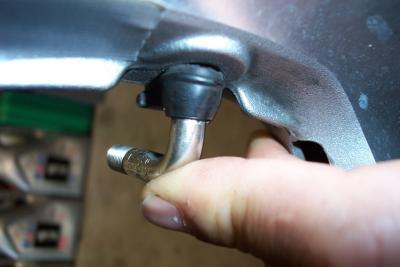
My wife and I took the bike out for a ride early one morning to give the SmarTire system its first test. About 20 miles into the ride the yellow alert symbol began flashing on the indicator and it showed a 6psi pressure loss in the front tire. I just figured it was because I had not set the proper cold tire pressure into the system. When we got to the next gas station, I checked the front tire for any nails or punctures and then I simply added a few pounds of air and we went and ate breakfast. After breakfast, we got back on the bike and headed back toward home. About 5 miles down the road the alert came back on and this time said the tire had lost 8psi. I was at first a bit skeptical and thought that the system must be malfunctioning, but reduced my speed just in case it was indicating a real problem. I took the most direct route back home so I could find out what the problem was. Once I got the bike in the garage, I checked the front tire pressure and sure enough, it had indeed lost 8psi in about 15 miles. A closer examination of the front wheel revealed that the tire stem itself had cracked around the base. The tire stem in this bike is a right angle stem and it was only leaking when the wheel was actually in motion, as this caused the stem to flex outward toward the edge of the rim and open the crack in the rubber to allow air to leak out. Had it not been for the SmarTire system, I probably would not have discovered this problem for some time and would have likely been on a trip when it failed. As a result, I was able to resolve the problem at home with my bike in the garage. Also, when I inspected the rear valve stem I found it had cracks as well and it wouldn't have been long before it had the same problem. So on the very first ride, the SmarTire system already paid for itself and worked as advertised. It very well may have saved both my wife's and my life.
(Broken valve stem discovered thanks to SmarTire!)
Conclusion
In the first hour of use, my SmarTire system paid for itself when it most likely saved me from at the least a flat tire out in the middle of nowhere, and possibly even some worse fate. The system works well and does exactly what it was designed to do. In addition to the safety aspect, I suspect it will also allow me to get slightly better mileage out of my tires, as now I can more closely monitor the pressures in them and keep them at a more accurate level. The backlit LCD display is well designed and is easily viewable in both day and night. The yellow alert beacon is also bright enough to be easily seen in daylight, though I wish it was a bit larger and had some sort of audio alert as well built into it.
A few weeks after I installed my system, SmarTire conducted a recall on the tire sensors. Apparently there was a problem with about 5% of them, that resulted in the sensors failing after installation and coming loose. As a result, SmarTire recalled every single sensor and replaced them on their own goodwill. They sent me two new sensors, and also offered to pay for any labor involved replacing them. Despite the inconvenience of the recall, I felt that they handled it all very well. They sent my new sensors the day they called me to inform me of the recall, which arrived two days later on my doorstep. They were very proactive in resolving this problem.
I did have a problem with the receiver loosing the learned codes of the new sensors a couple times after I installed the new one, but all I had to do was reprogram them by holding in the button on the display and forcing it into the learning mode. I later determined that part of the problems I had were probably my fault as I did not properly lock in the codes at the end of the learn process by pushing the button and then turning the system off.
One other small grip is that there is no way to check the pressures in your tires without first getting both wheels up to about 6mph. This means you can not easily use the system to check tire pressure in the morning before a ride. You have to get on the bike and get it moving a bit and then check to see what the pressure reads once the sensors begin to transmit. This is not a real big deal, but it does require you to remember to watch the display once you get moving, and if your tires are low, you then have to turn around and go back to the garage to add air. It would be nice if the sensors were a bit more sensitive to movement and could be triggered into transmitting by simply rocking the bike a bit. But this is a nit pick, and is easily outweighed by the convenience of not having to bend under the bike to check tire pressures before every ride.
Overall I would have to say that this is a most worthwhile product that could very easily increase your tire mileage, and might even save your life. It is well worth the cost.