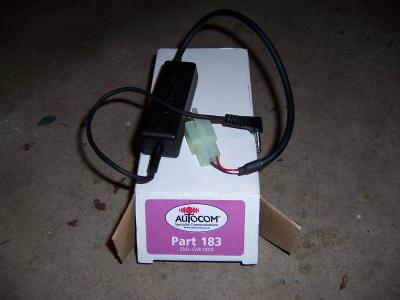
Autocom Pro 7 installation on a GL1800 Goldwing

Autocom products can be ordered from the following supplier:
TopGear Accessories Limited
P.O. Box 1477
Slingerlands, New York 12159
888-851-4327, 518-449-8677, 518-449-8876 fax
http://www.autocom.co.uk/
This article will address the installation and testing of the new Autocom Pro 7 intercom system on the GL1800. It is not meant to be a full up evaluation of Autocom. I have written two previous evaluations of both the Pro 3000 and Pro M1 system that already cover many of the basics, and you can read those reviews here if you want to know more about how Autocom intercoms perform in general. http://www.angelridevideos.com/reviews/
Ok, right out of the box, very few physical differences can be seen between the Pro M1 and the new Pro 7. The only really noticeable difference is that the headsets and headset leads now contain 7 pins instead of five. This was done to separate the ground leads from the microphone and speaker amplifiers. Other than that small change, the Pro M1 and Pro 7 are pretty much identical in outward appearance.
The biggest reason for installing an Autocom system on the GL1800 is because the stock intercom on the bike is extremely noisy. The microphones are always on, and thus always picking up wind noise. There are no wind noise filters in the intercom amplifier, and to make matters worse, the entire top shelter itself acts like one big microphone picking up even more wind, road, and engine noise and amplifying it and sending it to the headsets. Also, the higher you turn the intercom volume, the worse this noise becomes, and naturally when you can't hear each other on the intercom, the first thing most folks do is turn up the intercom volume. Due to all the noise problems with the GL1800 intercom, the system becomes pretty much unusable at any speed above about 70mph, and all the noise can also cause rider fatigue on longer rides.
The Autocom system uses a VOX circuit that only turns on the microphones when you are speaking, thus greatly cutting down on the wind noise. It also incorporates very effective active noise filtration circuits in the amplifier to further reduce wind and road noise, and the amplifier does not suffer from the internal microphonics noise that the GL1800 system does. So the goal of installing the Autocom is basically to have an intercom that is not as noisy and can be used at freeway speeds.
The Autocom Pro 7 system uses electret microphone elements that are powered microphone elements, so you have to install the Autocom headsets to use the Autocom intercom system. I will not cover headset installation in this review because it varies so much from one helmet brand to another, but the Autocom headsets install much like any other headset brands do and are not difficult to fit into most any helmet.
Autocom makes an interface adapter for the GL1800 that allows you to plug the output of the rear headset harness (via a Hitachi connector) into the music input of the Autocom through an isolation adapter (to prevent ground loop generated noise). This allows you to retain nearly all the functions of the stock audio unit including the Weather Radio, FM, CD player, and anything you have plugged into the auxiliary input like an XM radio or MP3 player. The only function you loose is the GL1800 built in intercom, which you no longer will need anyway. If you have a Kennedy adapter for your GPS or Radar Detector plugged into the front headset lead, you will still need to turn the intercom on for those functions to still work. If you set the intercom volume to 1 or 2 on the GL1800 and turn your GPS or Radar Detector volume up higher, this will greatly reduce the amount of noise the GL1800 intercom produces, and will still allow you to have the functionality of the Kennedy adapter as you did before.
GL1800 Interface Adapter
An adapter is also available to interface the Autocom with the GL1800 CB, but since I do not have a CB installed on my bike, I did not install or test this adapter. Instead, I interfaced the unit with a FRS radio.
The Autocom system also provides you with an auxiliary input that you can connect your Radar, GPS, or cell phone directly into it. This input mutes the music input level back when there is a signal into this auxiliary connection so it acts as an over-ride. You can also connect more than one device to this Auxiliary input via the dual isolation adapters Autocom has.
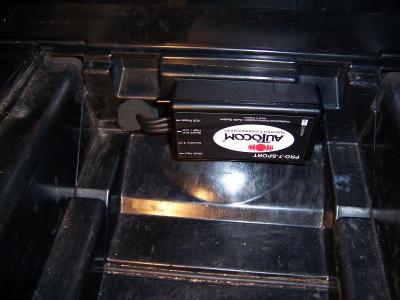
I installed the Autocom unit in the trunk where the CD changer would go. This required drilling a 1 inch hole (using a hole saw) in the plastic panel in the trunk so that I could get the Autocom connectors through. I simply used Velcro to fasten the Autocom unit to the back wall of the CD changer cavity and then plugged the hole I made with some stiff closed cell foam that I cut to fit. I did not mount the Autocom on the floor of the cavity because if you spill water in the trunk or have a leak, the water will pool in the bottom of this cavity. It probably wouldn’t hurt to make a drain hole in the bottom of the CD changer cavity so any water that collects will drain out.
Autocom unit mounted in CD changer cavity
Once the main unit was mounted, all that was left to do was to string the cables and connect power to the unit. A straight headset extension lead needed to be added to the riders lead so that it would reach all the way to the left front pocket and an extension lead and RML/PTT switch were connected to the transceiver input to allow use of a FRS radio. The RML/PTT switch was mounted on the bottom of the left handgrip assy under the horn button. The connections are all made using DIN style connectors and everything was pretty much plug and play. The connectors for the FRS/CB are 5 pin and the headset leads are 7 pin, so you do have to be careful to use the correct extension cables on the proper cords but other than that, it was a fairly simple matter to remove the seat and left pocket and route the cables into position.
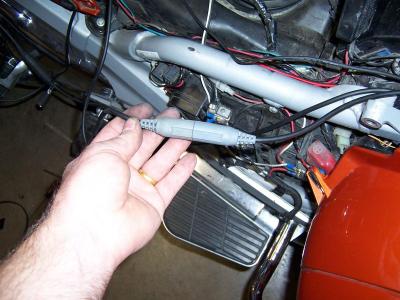
DIN Connectors for plug and play installation
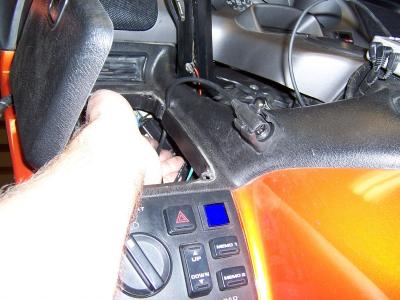
Autocom Headset lead replaces GL1800 headset lead
Testing
We have used the Autocom Pro7 for about 4,000 miles now through a variety of wind and road conditions and have a pretty good feel for how it performs.
One of the first things I noticed right away was that the headset leads now have a small rubber lip on the inside of the connector that makes them snap and lock into place better and they feel like they just make a more positive connection. The rubber seal appears that it would give better water protection as well.
It took several tries for us to get the VOX setting in a position that allowed for easy communications, without having it trip at higher speeds. Crosswinds seem to present the most problem and they usually would trip the VOX. We used full face helmets for our tests, and if the passenger lifted the facesheild open at speed, this would usually cause the VOX to trip as well due to the increased wind noise. As long as there were no heavy crosswinds and the passenger kept the face shield closed, the VOX worked properly. You can increase the VOX trip point to solve this problem, but then it becomes hard to make it trip at lower speeds without actually shouting. Autocom has a wind sock for the microphones, and this also helps but it does not totally solve the problem.
The volume level of both the intercom and the music are substantially increased from the previous Autocom model. As an example, with the XM radio on, I used to set the GL1800 volume at 12 on the older Pro M1 Autocom. On the new Pro 7, I now set it at about 6 or 7 to get the same volume level. The VOX circuit also seems to operate better and it is not as difficult to keep it on once you start speaking. The noise filtration circuits have also been improved and I noticed my FRS radio transmissions sounded better on both ends as a result. We tested the unit both in bike to bike communications, rider to passenger, and with a variety of music, radar, and GPS inputs. It all operated as expected and we did not have any problems with it.
There is no real volume control for the intercom level on the Autocom, only a high/low shorting plug for use when you are wearing earplugs. The low volume level is more than sufficient for normal use and I never really missed the ability to adjust the volume as it always seemed about right. The high volume position works well if you are wearing ear plugs, but would probably be unpleasant without them. Also, it is worth mentioning here that using earplugs on any motorcycle is probably good advice, especially for anyone who is a long distance rider. Long term exposure to loud noise, either from the wind or from the headsets, can and will cause tinnitus, which is irreversible. Wearing earplugs while still listening to music and using the intercom presents the greatest challenge to any intercom/headset, and you will need to be able to increase the volume level substantially. The Autocom passes this test, and is able to provide sufficient volume levels for both music and speech even while using earplugs.
The quality of the speakers provided with the headsets are above average and if properly aligned in the helmet, provide good bass response and solid performance and volume levels. However, if the speakers are not properly aligned with your ears, you will notice a large decrease in volume, so proper positioning is important.
Minor Complaints
Back when Autocom first came out with the Pro 3000 in the mid 90’s, they incorporated an auto volume microphone in the riders headset lead. This auto volume mic was used to sense the ambient wind noise. The system would increase both the music volume and the VOX threshold as the ambient noise increased. Having used a Pro 3000 system for several years, I can tell you that the VOX worked significantly better on it than on any other Autocom model I have used. I never even had to make any adjustments to it, and left it at the factory settings. When you would ride into a crosswind or at higher speeds, the auto volume circuit automatically increased the VOX threshold so it would not trip and open the mics. At speeds below about 50mph the VOX level would return to a lower setting allowing you to speak without having to shout to get the VOX to trip. It all worked flawlessly and in the 70K miles I put on the system, I do not ever remember having a problem with the VOX. Unfortunately Autocom no longer uses this auto volume mic and circuit on their intercoms, presumably due to cost cutting measures.
The other issue we have with the system is that my wife never seems to like my music tastes, or doesn’t like the levels I play it at. She needs her own volume control so she can turn the music down, or off, if she doesn’t want to listen to it. The original Pro 3000 had a fader control on it that would allow you to adjust the levels of the music for rider and passenger, though you had to access the unit to do so. There needs to be either a fader or a volume control on the passengers headset lead so they can adjust the volume as needed. Autocom has informed me that they are working on a headset lead with a volume control incorporated into it but they do not have a date on when it will be available.
Ideally, the system would have a remote fader control that could be mounted on the handlebars, enabling the rider to adjust the volume front to rear as needed. The same could be said for the VOX adjustment as well. If the VOX control setting could be remotely located on the handlebars, then when you get into a crosswind, all you would have to do is reach down and turn the VOX up manually a bit instead of pulling off the road, removing the seat or digging in the trunk. All that would have to be added to make this a flawless system are two simple rheostats on a small remote control panel with a cable that goes back to the main unit to allow you to control the VOX and the fader operation.
Conclusion:
Despite minor annoyances with getting the VOX threshold properly set, and not being able to adjust the passenger volume level, the Autocom is a vast improvement over the stock GL1800 intercom. Gone is all the wind and road noise that the GL1800 intercom has as well as the problem of the top shelter acting like one big microphone. There really is no comparison between the two. The active filtration noise circuits on the Autocom are superb and almost completely remove all the background noise. Having a conversation at high speeds is effortless as a result and the system can be used at speeds where the GL1800 system is totally worthless. Also, despite its minor glitches, the VOX system on the Autocom means you don’t have to listen to open mics when you aren’t talking, which further reduces noise levels.
If you travel two-up for several days in a row, you will soon see how tiring a noisy intercom can become. It will fatigue both rider and passenger and will reduce the number of miles you can ride comfortably in a day. Having a quiet intercom is not a luxury, but a necessity on a touring bike and the Autocom delivers this. By comparison, it makes the GL1800 intercom sound like two tin cans and a string.
Additional photos can be found here:
http://www.pbase.com/fredharmon/autocom