Fred Harmon
08-07-2005
Helmetcamera.com
39 McWhirt Loop Suite #103
Fredericksburg,VA 22406
Phone 540-361-1552
Fax 540-361-1554
http://www.helmetcamera.com/
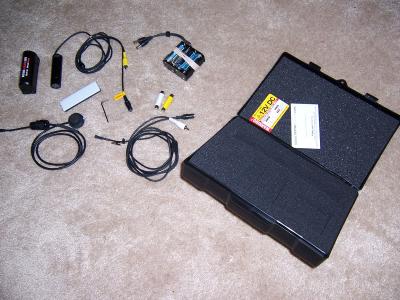
Helmet Cam Extreme Kit with High Resolution Camera and Remote Control
I am remiss in getting this review on paper, but I have an excuse (dont we all?). It seems I have three sets of new tires in my garage and another on the way, and I am doing my darndest to try to wear them out. So all my free time has been spent riding instead of typing.
The Trip
In late May, the Misses and I took off on our annual motorcycle vacation out west and took the new High Resolution Helmet camera system with us. We rode about 6K miles this year through 8 or 9 western states on all kinds of roads and in all kinds of weather and temperatures. It was a pretty good test of the Helmet Cam and I am happy to report that it passed the test with flying colors and I am truly impressed with the quality of the video we got. We filmed everything from snow covered roads in the high Sierras at 12K ft and above, to Death valley at over 200 ft below sea level. We filmed all up coastal hwy 1 in California to the Avenue of the Giants to the Grand Canyon to Zion Park and Capitol reef in Utah. Some of the footage is absolutely breathtaking. We even caught a F-15 doing extremely low level flying on the desert floor outside of China Lake. Having the helmet cam hooked up and ready to go enabled me to catch all this, and much more on film. My plan is that when I get to be 85 years old and cant ride anymore, I can at least put on one of my DVDs from my trip and relive my vacation in the rest home. I suspect I will be the envy of every old timer in there.
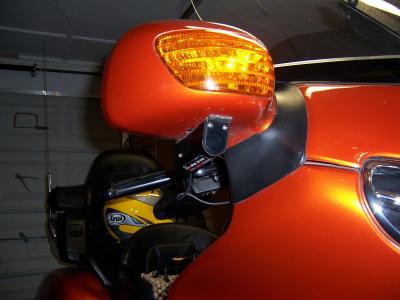
Mounted to bottom of mirror
Mounting
But on to the review. I tried the Helmet cam mounted in three different positions. The first position was under the right hand mirror, and this proved to be one of my favorite spots. Having it hard mounted to the bike gives you good sense of lean angle and speed, and the fairing and mirrors seem to provide a stable platform so that vibration is at a minimum, at least on the Gold Wing anyway. Other bikes may not work as good with the camera in this position.
The second position I used was on the left mirror. This allowed for a better view of the scenery and oncoming road on the left side of the bike and I used this location mainly for filming the ocean off the coast of hwy 1 while traveling north. It gave a nice view of the road, mountains, and ocean all in one shot.
Mounted to helmet

The third location I used was mounted on top of my helmet. This presented some challenges in operation as well as in filming. Since wires must be attached to the camera and fed to the camcorder, this means you have wires coming off your helmet that you need to be mindful of. I had elected to bungee cord the camcorder to the right glove box lid as this allowed me easy access to change tapes and batteries. This meant that the wires from the helmet went down to my camcorder that was bungeed to the bike, so anytime I got on or off the bike with the helmet cam mounted to my helmet, I had to be careful not to yank the camcorder off the bike. No real big deal, but just something to be mindful of.
When filming with the camera mounted to the top of your helmet, it gives a whole new perspective. You body does a fair job of absorbing road shock so it results in less jitter. But you do have to be mindful of where you look when you ride. Constant mirror and speedometer checks can result in wild camera swings, so you have to learn to move your eyes more and your head less. This mounting location also allows you to pan the camera off to the sides to take in some object you want to film, by simple moving your head. But just remember, the bike wants to go where your head is pointed, so don't let yourself get so distracted trying to film something that you ride off into the ditch, or worse.
Connecting
I ran the Hemet cam off a 12v dc regulated adapter connected to the bikes electrical system so that I did not have to constantly feed it batteries. There is a warning in the helmet cam box not to exceed 12 volts DC, so I was hesitant to hook it directly to bikes electrical system, as it will sometimes go as high as 14.8 volts. When I spoke to the folks at Helmet Cam, they assured me that this would not harm the camera, but I didnt want to take any chances, so I ran it though a cigarette lighter adapter that regulated the voltage to 12 volts.
Camera and Extreme Mount
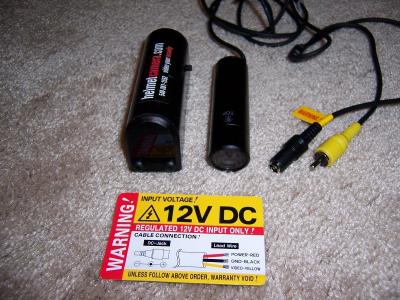
Extreme Mount
The helmet cam Extreme kit I purchased provides an enclosure that is designed to protect the camera and lens from bug strikes and other accidents. I highly recommend using this enclosure, as one bug strike without it, and the lens could be permanently scarred. It also provides a nice surface for mounting via the provided 3M Dual Lock type connectors. I also recommend buying some extra Dual Lock connectors as you will need more if you want to experiment with different mounting locations.
Filming
The standard lens that comes with the High Resolution version is a slightly wide angle lens, and I found it to be perfect for filming on the bike. It does tend to make some objects a bit smaller but it also gives you a better overall view of the surrounding and enables you to see more than just the road in front of you. I think it also helps reduce some of the camera shake and just makes the video more watch-able.
Last year, I took one of the normal resolution cameras with me on our western US trip, and I have to say that the color and clarity of this new higher resolution camera is vastly better. One of my complaints with the older system was that it appeared a bit grainy at times and just did not show the details and color as well. This new High Resolution camera does indeed do a much better job than the low res version and is well worth the extra expense.
LANC Remote Control
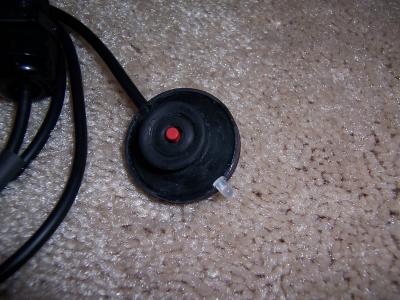
Remote Control
The shining jewel that made it all work so flawlessly was the CamEye Sport Remote control. This is a single push button with an LED that changes color mounted to a small circular pod and then attached to the camcorder via a LANC connection. This allows you to have complete control of you camcorder via a button that you mount on the bike in a convenient location. It allows you to record, pause, turn on, and turn off the camera with this single button. The LED changes color from red to green to yellow to tell you of the various states the camcorder is in. It even flashes and changes color to warn you when you are running low on tape or your batteries are running out. You could easily mount the camcorder in a saddlebag or tank bag and completely control it via the LANC remote. On my last couple of trips with my camcorder I did not have this button and was constantly having to pull off the road to start and stop the camcorder. It was a real inconvenience, not to mention the safety implications of trying to work the camera controls while riding. In hind sight, I wouldnt even attempt to film from the bike again without one of these controls, and I wouldnt buy a camcorder that couldnt support it. It is simply a must have item. Not all cameras have this LANC connection, but most all Sony cameras do. Check with the folks at Helmet Cam and make sure your camera will support this feature before you purchase the Remote.
Microphone
A small microphone is supplied with the Helmet cam kit, and I experimented with a variety of mounting locations. This is a powered microphone, so it also needs 12 volts in order for it to work. You dont want it anywhere in the wind stream or else you will just end up with a lot of wind noise on the tape. Ideally, you would like to be able to hear the engine and road with just a hint of background wind noise. I found that wrapping some tissue around the mic element and putting it in under the gas tank lid on the GL1800 worked well, but I had to remove it whenever I filled the tank to keep from sloping gas on it. Other good options would be in one of the glove boxes or possibly under the seat. The end result is that I have a muted background sound of the road and bike that works well with the video. Most of it I plan to dub in background music to anyway, so the low level of road noise can probably be left on the final product to provide the proper experience when you watch it.
Conclusion
All in all, I had zero problems with the system. It did take some effort to get all the wires mounted and under control, but once I came up with a suitable arrangement, I never had to mess with it again. Being able to turn the unit on and off and start and stop recording with one hand allowed me to conserve batteries and tape and only film the portions of the trip I deemed worthy. The camera held up through two pretty good rain storms, one snow event, several excursions below 32 degrees, and one excursion above 105 degrees. It worked flawlessly the whole trip and was well worth the amount I spent on it, as now I have a permanent record of our journey.
More photos available at http://www.pbase.com/fredharmon/helmetcamera