Manufactured by Dixon Y Machine, Inc.
8749 Pedrick Rd.
Dixon, CA 95620-9604
Phone (707) 678-2375
Fax (707) 678-1689
Email sales@pakitrak.com
Website http://www.pakitrak.com
A complete photo gallery showing installation of the Pakit Rak on the GL1800 can be found here:
http://www.pbase.com/fredharmon/pakitrak
For those times when the saddlebags aren’t enough, and a trailer is too much.
Let me preface this article by telling you that I am a minimalist when it comes to packing on a motorcycle for extended travel. Less is more in my book. If there is something I didn’t bring with me that I need on a trip, I figure I can always stop and buy it somewhere along the way. I like to travel light and find I usually have more fun when I do. However, when my wife is with me on an extended 15-20 day trip and we are going to travel through Death Valley and 100 degree temperatures at one point in the trip and then go through Glacier Park and mid 30 degree temps at another point, it becomes real difficult to pack all the clothes and motorcycle gear we need that will cover such a wide temperature range. On the last two long trips we made, every nook and cranny of the bike was filled, and then when we got in warmer temps there was no room for us to store our riding pants, so we had to wear them through the desert, which was not real comfortable. It sure would have been nice if we had some extra space to put those layers of clothes when we need to peel them off in hotter temps. Another challenge for me is finding room for a pair of tennis shoes to wear around the hotel or out to eat. I never seem to be able to find space left to pack them in, and usually end up wearing my riding boots everywhere I go as a result, which tend to look especially goofy when worn with shorts.
I had considered adding a luggage rack and top bag to my bike to get a bit of extra space, but I really don’t want to drill holes in my trunk lid. There also have been numerous reports of trunk lids cracking and chaffing the edges due to the added weight of trunk luggage racks and top bags. Adding a bag on top of the trunk lid puts all the weight up high and the bag can also act like a sail in the wind. According to Honda, loading limits on a trunk mounted luggage rack are limited to only 3 lbs. For all these reasons, I decided a trunk mounted luggage rack was just not the direction I wanted to go.
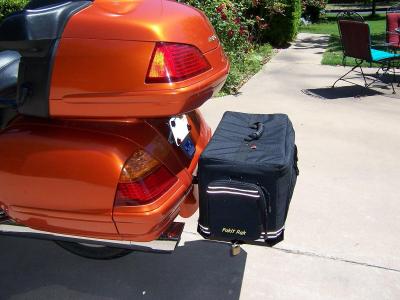
This is where the Pakit Rak comes in. It is a complete system that consists of the receiver bracket that attaches to the bikes saddlebag frame, a steel tray, and a high quality luggage bag that is mounted below the license plate at the rear of the bike. The idea is that this keeps the weight down low, and out of the wind signature while adding that extra space that we all seem to need. The cost of the total system is $350 plus freight.
Dixon Y Machine also sells the tray and bag with adapters that can be used on existing trailer hitches if you already have one installed. I suspect this means that the system can probably be installed on bikes other than the GL1800 (Concours?) that have trailer hitches, but you should contact the manufacturer before doing so. A cooler rack is also offered on their site as an alternative to the bag.
The quality of the materials is first rate. All the metal pieces are fabricated from 18 gage sheet metal, welded and powder coated, and the bag is an extremely fine piece of luggage, and not some flimsy duffel bag. When the receiver bracket is installed, it is completely hidden and when the bag and tray are removed and the reflector is reinstalled there is no outward evidence visible on the bike. The bag has stiff panels in the sides, top, and bottom that help it retain its shape even when empty and it has a separate zippered panel for storing maps and some inner mesh pockets, as well as expandable side pockets. I did notice the zippers were a bit stiff, but I suspect once the bag breaks in they will loosen up. The 21(w) x 12(h) x 11(d) inch bag has a total capacity of over 3,000 cubic inches, which is no small amount of space. On the bottom of the bag a sleeve is sewn and riveted in place. A steel support slips through the bottom of the tray and into this sleeve to secure the bag to the tray. This means you do not have to tie the bag down to the tray or mess with bungee cords to secure it to the bike. And since the support bar can be locked on the end, this also prevents someone from taking the bag off the bike when parked. Two locks and a rain cover are also thoughtfully included and if you keep the rain cover on the bag anytime you have it on the bike, it also will keep grit and road grime from accumulating on the bag, and prevent fading from the sun.
This shows how the locking bar slides into the bottom of the bag
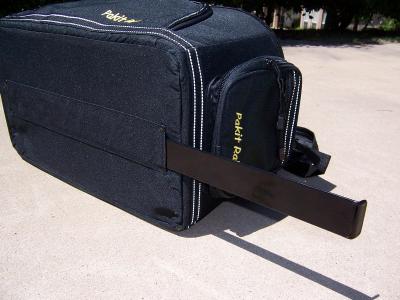
Sliding the bar into place

Since the receiver bracket assembly gets mounted only to the saddlebag frame, this means you can still change a rear tire out on the road if you would ever need to. You will have to take off a few more bolts than before, but it should only add a couple minutes more to get it off so you can roll the rear wheel out the back of the bike. My only complaint here is that the hardware used is SAE and not metric. This means getting the 7/16ths nuts off the U bolts may be a difficult using the metric tools that most folks pack with them on the bike.
Another minor grip I have is that you can not use the helmet lock holders when the system is installed, as now my full face helmets can no longer reach the locks. I am told that a set of helmet extension tabs will resolve this issue, though I have not had time to check that out for myself yet.
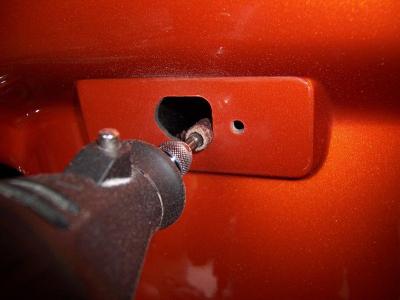
It is also important to point out here that the receiver bracket for the Pakit Rak was not designed to use for towing and should never be used in this manner, as it will damage your saddlebag. There is a large warning sticker right on the bracket that specifically states that it is not a trailer hitch.
Receiver Bracket

Installation:
The Pakit Rak is pretty straight forward to install. The kit comes with well written instructions that has diagrams showing how to install the system. The first step is to install the receiver bracket onto the bike. You first remove the rear fender center panel and then take off the center support bar behind it by removing two screws. The receiver bracket is then positioned so the lower two holes line up with the mounting studs for the center support bracket you removed and you reuse the two 10mm bolts and put them in finger tight only. Then you install two U shaped bolts over the upper cross member piece and work them into position and through the upper holes in the bracket and install the lock washers and nuts. I had one minor problem here when doing this, as it appears that there are some minor tolerance variations of the positions of the upper support bar and lower mounting studs which made it impossible to get the U bolts into the holes for the bracket. This was easily remedied by simply elongating the holes in the bracket about ¼ of an inch with a round file. The folks at Dixon Y Machine assured me that they are aware of this issue and have increased the length of the holes on the bracket to allow for this on their most recent production run. So you should not encounter this problem. Once you get both the U bolts installed and lock washers and nuts on finger tight, you can then go back and start tightening all the hardware. Care should be taken on this step, as the threads in the lower studs are aluminum and can easily be stripped out and the tube that the U bolts goes over is also aluminum and can easily be crushed if the bolts are tightened down too much.
Once the bracket is installed, you remove the reflector off the rear fender panel and then reinstall it. Now comes the hard part. You have to make a hole in your fender panel for the receiver bracket. But it really is not as bad as it sounds. I started by drilling out the existing hole in for the reflector so that it was large enough to get my Dremel brand rotary tool into it. I used a small diameter sanding drum tool. Since the square receiver tube is now directly behind this hole, you can simply grind out the area using the receiver tube as a guide for the Dremel tool. Once you are done, you will have a square shaped hole to the perfect dimension of the receiver. The hole is also small enough that when the reflector is reinstalled it completely covers it, so you will never know it is there and several 3M Dual Lock connectors are supplied to allow you to reinstall the reflector when you are not using the Pakit Rak.
Making the hole with a Dremel tool
The instructions state that the Pakit Rak is designed to support 25 pounds, which includes the weight of the luggage bag (7 lbs). This means you are basically limited to carrying 18 lbs of gear in the bag. Ideally, you should use the bag for lighter bulkier items anyway, and put heavier items in the saddlebags, as that will position more of the weight from them further forward on the bike. Also, you need to keep in mind that since the Pakit Rak attaches only to the saddlebag frame, you have to be careful not to overload the bike. Maximum load in the saddlebags and trunk is stated by Honda to be 71 lbs. This means if you put 20 lbs in each saddlebag and another 20 lbs in the trunk, you have 11 lbs left to stay in the Honda guidelines. Since the Pakit Rak system itself already weighs in at 17 lbs, you can see how you could overload the saddlebag frame if you stuff every compartment full and to the max weight allowance. Care should always be taken any time you load a motorcycle and you should take the time to weigh your luggage before putting it on the bike. Weight should be distributed evenly and loaded in a manner so it can not shift when you are riding. If you understand the intended purpose of the Pakit Rak, and use it as it was designed to be used, you should not have a problem. You should only put lighter weight items in the Pakit Rak and keep all your heavier items in the saddlebags and keep the weight of the Pakit Rak luggage bag within the stated limits. If you follow this advice, you should not have any worries.
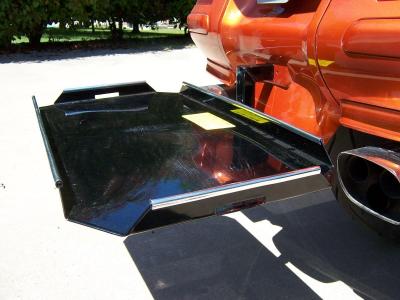
Receiver Braket and tray installed
On the Road:
Once installed, I took the bike for a ride with the bag mounted with nothing in it. First, I wanted to see if I could perceive any change in the handling of the bike, so I rode some familiar roads at a fairly aggressive pace. I was not able to detect any changes in the way the bike responded. Next, I rode in a 20 mph crosswind for several miles and could not feel any handling changes from the bag’s wind signature. I then loaded the bag and again tested the bike and was not able to detect any noticeable difference in handling. This can most likely be credited to the position of the weight. It is all down low enough that it does not adversely affect the bikes center of gravity.
A Few Personal Thoughts:
Ok, I am going to get a bit critical here, so take all this with a grain of salt…
I always believe lighter is better when it comes to motorcycles. Anything that adds weight to a bike, subtracts from available horsepower, decreases tire life and gas mileage, and makes the bike more awkward to handle. In general, more weight = less fun in my book. So I go to a fair amount of effort whenever I add an accessory to the bike to consider the weight penalty I am paying for it and I am also very particular about what I pack on the bike and what I leave home. This brings me to the issue of overall weight of the Pakit Rak system, which is 17 lbs total. Seven (7) lbs of this comes just from the luggage bag. While it is an absolute first class bag, you do pay a weight penalty for it, and for every additional pound of weight that the hardware and luggage take up, that is one less pound of stuff you could carry. You basically have added 17 lbs of weight in order to gain 18 lbs of carrying capacity.
You should understand that the Pakit Rak does not add additional weight carrying capacity to the bike but instead adds additional carrying space. The extra space affords you the ability to pack liners and riding pants in the Pakit Rak when it gets hot, and since the bike is already carrying this weight (on your body) all you really are doing is transferring the location of the weight. So if you leave on a trip with the Pakit Rak only one half or one third full, you now have room to store your gear when you want to go eat in a restaurant and not look like a space alien, or it gets warm and you need to peel off some layers. The additional space can also be used to pack bulky items (like jacket liners or gloves) that take up a lot of space but don’t add much weight.
There obviously is some room for improvement in the system with regards to weight, and the inventor is looking into the possibility of making some or all of the components out of lighter weight aluminum in an effort to reduce weight. Also, bear in mind that the receiver bracket assembly on the Pakit Rak only weighs in at 3.5 lbs. This is several times lighter than even the lightest trailer hitch on the market, some of which weigh close to 20 lbs. So the Pakit Rak has an obvious weight advantage over any other similar systems that I am aware of.
One other concern is the fact that the receiver bracket itself mounts to the saddlebag frame, which is made out of aluminum. While I do believe that this will not pose any problems if the loading limits are strictly followed, there is always someone out there who will overload the bag. Be cautioned, that overloading the bag could result in warping or bending your saddlebag frame. But the same danger exists on any bike if you overload just the saddle bags and trunk. Again, just be mindful of the 71 lb total luggage limit and 25 lb Pakit Rak recommended limit and stay within them.
Another issue for me is visibility from the rear of the bike. The Pakit Rak is basically black and the luggage bag does hide a small portion of the tail light. While not a big issue, any reduction in visibility is not generally good on a motorcycle. I feel a slightly smaller bag might be better suited than the current size and would also help reduce the chance of overloading. The reduced size would not only increase visibility, but it also would reduce the bag weight some, and like I stated before, every pound of weight the system loses, is one more pound of stuff you can carry. A couple brightly colored reflective strips added to the rear of the bag and on the rain cover would also help out with visibility.
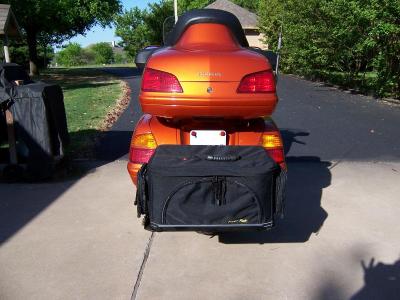
View from the rear
In Conclusion:
Despite my concerns with the weight of the bag and the steel hardware components, the Pakit Rak still seems to be the lightest game in town when it comes to adding more carrying space. While the system is not inexpensive, the bag and components are all first rate and everything just plain works. The bag is attractive and when mounted on the bike it does not detract from the looks of the motorcycle. Everything you need is provided in the kit, including the rain cover, and even the locks for the luggage. The system is carefully thought out and will still allow you to change a tire when on the road while providing ample support, provided you stay within the recommended loading limits. There does not appear to be any significant handling penalty that I can detect and the addition of the extra space on the bike will make those long two-up trips much more pleasant. The bag and/or tray can easily be removed and brought into the hotel at night making packing and unpacking that much easier. Sure, I have some minor complaints and I see some room for improvement, but all in all, I would say this system is a winner. My wife and I plan on taking the Pakit Rak on its maiden voyage next month, which will be a 17 day-7k mile trip out west, and I will write a follow up to this review when we return.
Now maybe I will be able to pack tennis shoes so I don't look so silly in my boots and shorts
My wife and I took the Pakit Rak system on a 5,700 mile journey accross the Western US and we were able to use the bag and rack mount through a variety of weather, environments, and circumstances as well as different loading conditions and roads and terrains. The following are my thoughts and experiences following this trip.
First off, the Pakit Rak allowed us much more freedom when packing. I bought a fleece zip up jacket in Durango Colorado one cold morning that looked like it would serve as a good liner under my jacket. Without the Pakit Rak, I would not have had any room left to pack it into, and while it did not weigh much, it was considerably bulky. This fleece jacket served useful for me later in the trip when we encountered near freezing temperatures at Lake Tahoe and again later in Flagstaff. By putting some of the bulky items in the Pakit Rak, it allowed the trunk to be much less cluttered and useable. Normally, we have the trunk and saddlebags stuffed so full that there is no room left in them, and invariably, the item I will need always seems to be at the very bottom of the trunk, which means I have to unpack it just to get what I need out. Having the Pakit Rak on the bike allows me to keep the trunk much more organized and I can keep only the things I need ready access to in it.
Deciding exactly what to keep in the Pakit Rak and what to put in the trunk and saddlebags was determined through a trial and error process. Ideally, I would like to only keep lightweight bulky items (like liners and gloves) in the Pakit Rak to reduce the weight at the rear of the bike. But the only problem with this is that the items in the Pakit Rak are the most difficult to access, since I normally keep the rain cover on it. Having to pull off the rain cover and wrestle with the zippers on the side of the road to get at your liners can be a bit of a nuisance. So I ended up transferring our liners to the trunk and saddlebag. In the end, the main items I used the Pakit Rak for were our spare shoes (1 pair each), dirty laundry bag, and some other various items. My wife gets the right saddlebag for her clothes and cosmetics, and the left saddlebag is for my clothes and the tool kit. Another viable option might be to put one of the sets of clothes in the Pakit Rak, but I was hesitant to load that much weight so far aft on the bike, and tried to keep the heavier items further forward on the frame. One has to remember that the main limitation is not really the carrying capacity of the Pakit Rak as it is the overall carrying capacity of the motorcycle itself.
I did notice some handling differences once we got under way, though this is not unusual when we load the bike up and travel two-up on it. It did seem like the back end of the bike was a bit more bouncy than normal, and most of this was due to me not having my aftermarket Works Performance shock properly dialed in for the added load. I ended up having to increase the rebound dampener adjustment significantly to handle that added pre-load that needed to be applied to the spring. I never really did find the right settings that worked for the entire trip and found myself constantly adjusting it for various road conditions. The added weight of the Pakit Rak definitely made getting the shock dialed in properly more difficult and it did increase the sag on the rear of the bike. I found myself scrapping the foot pegs a bit more often until I dial up the pre-load setting and rebound damping. It was not an insurmountable problem but something that should be considered as it may take some trial and error adjustments to find the settings that provide a smooth ride for the passenger, but one that also does not compromise ground clearance too much. But to be fair, the problems I had with the suspension settings were due to my aftermarket shock I have installed, and not from the Pakit Rak. The bag is mounted in a position where it does tend to pick up a significant amount of dust and dirt from the rear wheel. As a result, you would be well advised to keep the rain cover on the Pakit Rak bag at all times. Even so, my bag still managed to get some dirt on it over the course of the trip, but for the most part it was relatively clean. We rode in rain several times through the trip, and never did anything in the bag get wet. If the rain cover is installed so that it covers the Pakit Rak tray completely, it will prevent any water from collecting and soaking the bottom of the bag. As a safely precaution, I put the items in the bottom of the bag inside plastic bags, but it turned out not to be necessary. All of the contents of the bag were clean and dry throughout the trip.
In my earlier report, I mentioned not being able to use the helmet locks for my full face helmets with the Pakit Rak bag installed. During our trip, I found that with a bit of effort in positioning the helmets, I could indeed still use the helmet locks and lock both helmets to the bike with the bag installed, and without the need for any helmet holder extensions. So I have to retract my earlier statement, as you can still use the helmet locks, if you position the helmets just right.
Enough good things can not be said about the added convenience of having the Pakit Rak on a trip like this. The ability to take the bag off the bike and carry it into a hotel room is a big plus and makes loading and unloading so much easier. Also, the fact that the bag is locked to bike when installed on the rack is a great security feature. We checked out of the hotel we were staying in, and rode the small gauge rail train from Durango to Silverton one of the days of our trip. We needed to be able to pack all of our riding gear, (including two jackets, liners, and riding pants), onto the bike and leave it parked for the day so we could ride the train in our street clothes. There is no physical way we could have done this without the Pakit Rak, as normally we are wearing our riding jackets and there is no room left in the saddlebags or trunk to store them. We were able to get everything packed into the bike and the helmets attached to the helmet locks and put a cover over the bike and left it in the parking lot for the day till we returned. Since we did not initially fill the Pakit Rak bag all the way up and left some space in it, there was enough room between it and the trunk to hold everything, and since it was locked to the bike (which has an alarm installed) we did not have to worry about the security of all our stuff all day long.
We were both real pleased with the added space and flexibility that the Pakit Rak provided us. Though I still wish the bag and rack mount and hardware were a bit lighter, it all worked exactly as it was designed to. Initially I thought the bag was too big for what I needed until we had to stuff all our gear in it and park the bike for a day. Normally, I would probably never fill the bag and would always want to have some space left in it for just such an occasion when we might want to put all our gear in it and be able to walk around in normal street clothes. Knowing my wife, I did not inform her that I had the Pakit Rak until after she was all packed for the trip and the bike was loaded and ready to go, as I knew that if she saw it, she would want to fill it up with stuff. Unfortunately I won't have this luxury on the next trip, so the trick will be keeping her from thinking she can take more than she used to. But for the most part, we are both light packers and have learned over the years, and numerous trips, to only take what we absolutely need and I hope to continue this practice. The Pakit Rak just gives us more flexibility and de-clutters the trunk tremendously. All in all, I am real satisfied with the performance of it.
Pakit Rak on Hwy One in California
